|
|
|
(even if you don't know how to play chess)
Updated August 2015
The Four Activities to Learn Each Piece:
Teach the pieces in this order:
Playing Chess
Before a Tournament
INTRODUCTION
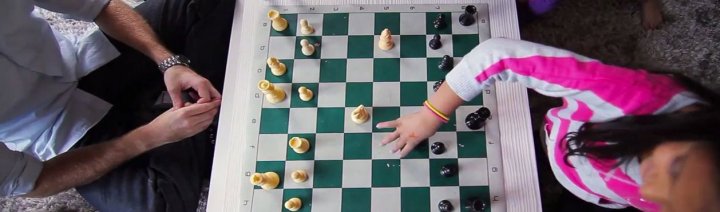
Welcome to the adventure of learning chess with your child. This guide is intended for parents who want to learn chess themselves, and want to teach their Pre-K, Kindergarten or 1st grade pre-readers how to play chess. This guide is intended to function with no reading requirement on the part of the child. Any links to reading material is for your benefit as the teacher.
Relax and enjoy the process! You could hand off the teaching to the computer, and we will include online resources, but don't miss this golden opportunity to learn with your child.
Chess is not hard to learn, but it is hard to master. And it does take patience and a "no-hurry" attitude when you teach your young child. To play chess, we just need to know three things.
You are the teacher, and the following three websites will assist you. Refer to them if you have a chess question, or need additional illustrative materials.
1. Learn To Play Chess, at ChessKid.com .
2. How To Play Chess, at CalNorthYouthChess.
3.
ChessKid.com (Gold membership preferred)
If your child is older, or you'd like to learn quickly yourself, exploring the above websites is all you need.
Enjoy the time learning and playing chess together as a special bonding experience. Your child will keep desiring to learn and play if they 1) enjoy the process, and 2) understand what's been taught. So, resist the temptation to go too fast, covering too much material in a session. And keep it fun - your attitude is key to your child's enjoyment of your time together.
Follow the order of content below, and use your judgment when deciding when to stop a session. It's much better to have a short session where they're asking for more, than to go too long until they're bored or cranky.
Do have frequent sessions, however. Nightly is good. Once a week is not enough. Commit to having a chess session at least two times a week.
Use the activities and Mini-games! Repeat Mini-games that your child finds fun.
You will be teaching how each piece moves, in this order: Rook, Bishop, Queen, King, Knight, Pawn.
Each time you teach how a piece moves, do the following Four Activities.
Activity 1: DEMONSTRATE
Activity 2: I MOVE YOU MOVE ONE
Activity 3: CAN IT GO THERE?
Activity 4: I MOVE YOU MOVE TWO
Now teach the following in order, using the Four Activities above for each piece. Play the Mini-games also in order. Make a note of where you stop after each session. When you resume at the next session, feel free to review the previous lesson, or just play a previously learned Mini-game. You're on your way!
Orientation:
1.ROOK
2.BISHOP
3.QUEEN
...Mini-game: Queen vs Four Pieces
...Mini-game: I Move You Move R-B-Q
4.KING
...Mini-game: Is This Check?
...Mini-game: Move Out Of Check
...Mini-game: Can the King Go Here?
...Mini-game: Is This Checkmate?
5.KNIGHT
...Mini-game: Horse Race
6.PAWN
...Mini-game: The Pawn Game
...Mini-game: Rook vs Five Pawns
THREE WEBSITES
One simple page. The video at the top teaches you the game in 13 minutes. The interactive diagrams below the video, and explanations, help you remember the rules.
Good for pre-readers. Parents or kids can click on any basic topic, and "Uncle Cal" will explain it to you via Flash Movies.
Here's where you or your child can play chess, either against the computer or against other kids. ChessKid.com has a free basic membership that allows you to play games, but the Gold membership has helpful benefits. Two primary benefits are access to the library of over 600 videos aimed squarely at elementary kids, and access to all the practice positions ("computer workouts") where one can practice basic checkmates against the computer.
GENERAL TIPS AND SUGGESTIONS
 First, it might be wise to make your child curious about the game so that they want to learn, instead of force-feeding them. If you know how to play already, have a friend over and play a few games while your child wanders around. If you don't know how to play, just set up the pieces in an accessible place.
LESSON TIPS AND SUGGESTIONS
THE FOUR ACTIVITIES TO LEARN EACH PIECE
Demonstrate how the piece moves -- place it near the center, and first point to all the squares it can go to. Then move the piece, and let go. Do this again a few times. When done, wherever it is, point again to every square it can go to.
Name the piece. Put one piece in the middle of the board. Take turns with your child moving it around the board. That's it. Keep it simple, don't add anything to this activity. Spice it up by moving the piece slowly at first, then gradually quicker.
Make a correct move with the piece. Ask "Can the (piece) go there?" After a few correct moves, make an obviously incorrect move, asking "Can the (piece) go there?" Spice it up by going slowly at first, gradually increasing the speed of the activity.
Each player gets one piece, starting on the square it normally starts on. You have White, so you move first. Take turns making moves. Avoid capturing at first.
Teach the pieces in this order:
1. ROOK (and how to capture)
Do the Four Activities. During this first lesson, make sure to demonstrate the correct way to move a piece: Lift it off the board slightly (don't slide it), not too high, and place it in the center of a square.
When teaching how to capture pieces, instruct your child to always do it with one hand. For younger students, gently nudge the opposing piece out of the center of the square with your piece. Then let go of your piece on the center of the square, pick up the opposing piece with the same hand, and set it off the board to the side. Practice slowly.
2. BISHOP
First, before showing how the bishop moves, explain and demonstrate "diagonal" using your arms, and the board. Then do the Four Activities.
Mini-game: Good Trade, Bad Trade
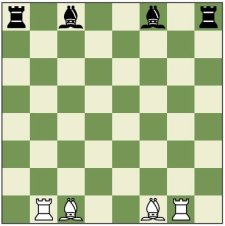
Set up all eight bishops and rooks on their starting squares, adjusting the rooks slightly sideways so they don't attack each other. (Diagram below, on left.) White goes first. Explain how the rook is usually more powerful than the bishop, since it can go to every square on the board, and the bishop can't. Explain and demonstrate an "even trade" (i.e. bishop for bishop) and a "bad" (and "good") trade. Ask questions like "Can you attack my rook? "Can you find a piece that I'm attacking?" Make sure they see when a trade is good for them and when it isn't.
3. QUEENDo the Four Activities.
Mini-game: Queen vs Four Pieces
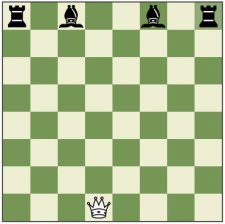
Place the white queen and all black bishops and rooks on their starting squares. (Diagram above, on right.) Explain that their four pieces together are better than the queen. Let your child know that they should try to hold on to as many pieces as they can. If they get down to one piece, start over. You play white and go first, moving your queen to a center square, attacking a rook. If they miss it, ask "Am I attacking anything?" Make sure they move the rook to a safe square. Keep attacking pieces, and again help them spot it if they miss it. After a while, you can start taking pieces, making a game out of it.Show them that the queen can attack two pieces at once. Often, not always, they can protect two pieces at once. Keep playing until your child has figured out how to hold onto their pieces by both moving them, and guarding them.
Mini-game: I Move You Move R-B-Q
Put all rooks, bishops and queens on their starting squares, adjusting the rooks and queens slightly so they aren't attacking each other. (Diagram, on left.) Play. First, make sure your child is moving the pieces correctly. Only then, start attacking pieces, encouraging them to get out of danger. Next, put your pieces in danger now and then, give them a chance to take your pieces. Move on when your child can move these three pieces, attack your pieces, take pieces, and protect their pieces with ease. This is a strong mini-game you can go back to if needed.
4. KING
Do the Four Activities.
Mini-game: Is This Check?
Explain "check" (when the king is attacked.) Set up a position with two pieces only where a king is in check. Ask, "Is this check?" After a few, start including positions that are not check. Next, explain that when the king is in check, the next move must save the king, that is, cause the king to no longer be attacked. Tell you child the kings are never to be taken off the board during a game. If the king is attacked, something must be done to get it out of attack, no exceptions. One way to do this is to move the king to a safe square, so that it's no longer in check. Now teach that the king can never move into check, into a square where it could be captured. It is not allowed.Check video from Uncle Cal --- Check! video from ChessKid Gold
Mini-game: Move Out Of Check
Practice moving the king out of check. Using only the king and one other piece, create various positions with the king under attack by a rook; then bishop; then queen. Start with positions where the king is in the corner. Then positions where the king is on the edge of the board, but not a corner. Lastly, create "check" positions where the king is away from the edge of the board. In each position, have your child move the king out of check. After the move, point out other squares where the king cannot go (because it would still be in check).Mini-game: Can the King Go Here?
Set up various positions where the king is almost in check (is close to attacked squares). Ask "Can the king go here?" pointing to various squares around the king. Reinforce that the king can never move into check. Now create positions with two kings, showing that two kings can never move next to each other.
4B. CHECKMATECheckmate can be a difficult concept for a child, so take your time, and be prepared to review.
First, ensure that your child understands check. Review if needed.
Next, explain checkmate thus: "Checkmate" is when the king is in check, and cannot get out of check. Tell your child the way to win a game of chess is to checkmate the other player. Remind them that you never take the king off the board. Checkmate ends the game. Set up a position with a king attacked by a rook, both pieces on the edge of the board. Review where the king can and cannot go. See that it's not checkmate. Now add a rook next to the first rook, creating a checkmate position. (Diagram on left.) Show how this is checkmate, because the two squares the king could run to are covered by the second rook.Now set up a position with a king attacked by a queen, both pieces on the edge of the board. Have your child point to the squares where the king can and cannot go. Now ask your child to place a rook on the board so that it's checkmate. Help them if needed. Repeat this process on different sides of the board.
Checkmate video from Uncle Cal --- Checkmate! video from ChessKid Gold
Mini-game: Is This Checkmate?
Show your child some positions that look similar to the last exercise with two rooks, but are not checkmate. Show your child how to get out of check. Now start the Mini-game: create similar looking positions with two rooks, or rook and queen, and ask "Is this checkmate?" Start with checkmate positions, then slowly include positions that aren't.
5. KNIGHT
The knight can be hard to learn. Be prepared to take time, and review.
Explain it's the only piece that can jump over other pieces. Do the Four Activities.
Exercise: Have your child put the knight in the middle of an empty board. Now have them place opposite colored pawns on the eight squares where the knight can jump to. Show how the knight always jumps to a square color opposite to the color it's on. Have your child capture all eight pawns, returning to the middle square after each capture. When done, instruct your child to hop to one edge of the board, then to the other side.Mini-game: Is This Check?
Same as "Is This Check?" before, but this time use a king and a knight.Mini-game: Horse Race
Put all knights on their starting squares. Each side takes turns. In this race, the adult has to get both knights to the corner on the opposite side, the child just has to get both knights to the other side of the board.
6. PAWN
Put all pawns on their starting spots, then explain that from its starting place, each pawn can move either one or two squares forward. Demonstrate. Explain that after the first move, it can only move one square forward, never sideways or backwards. Practice. Have them move a pawn down the board, one square at a time, until there's one square left.
Now get excited when you explain one of the coolest moves in chess ... when a pawn reaches the other side of the board, it gets to be promoted to any other piece! (Except a king, or pawn.)
Exercise: Put five pawns on their starting squares. Have your child move them down the board, promoting each pawn into all four pieces allowed, and then a second queen (use an upside-down rook). Make sure they take their hand off the pawn after each move.
Pawn Promotion video from ChessKid Gold
6B. PAWN CAPTURESExplain that the pawn is the only piece that captures differently from how it moves. It can't capture straight ahead, the way it moves. It captures diagonally forward. Demonstrate capturing, many times, with different pieces. Then let them do it. Explain and show how two opposing pawns can get stuck when they're facing each other. Demonstrate (a white pawn on e4, a black pawn on e5, for example). Pieces can block a pawns movement, too, if it's right in front of a pawn. Demonstrate with a knight. Create positions where a pawn may be blocked from moving, but can still capture and then move forward again. Play these positions out.
Mini-game: The Pawn Game
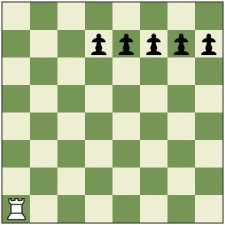
Put all pawns on their starting squares. First player to get a pawn to the other side wins. Let them queen a pawn the first few times, so they can practice promoting a piece. Variation (after several Pawn Games): Add a king to each side.Mini-game: Five Pawns vs Rook
Set up the rook vs five pawns position below (left). Your child should play this Mini-game from both sides.
RULES: Illegal MovesExplain legal (allowed) and illegal (not allowed) moves, and demonstrate. Show them examples, like: capturing your own piece, moving a bishop like a knight, jumping a rook over a pawn, putting your own king in check, moving two kings next to each other. Explain that if an illegal move is made, it must be taken back, and a legal move played. Have your child demonstrate some legal and illegal moves, with each piece.
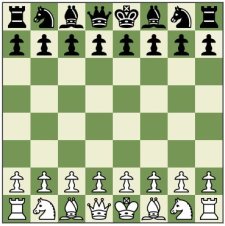
RULES: Board Setup for Real ChessGet excited -- we're almost ready for our first chess game!
Make sure you have a light square in the near right corner. ("Right - light.") Explain that each piece starts in the same place when you play chess. Slowly place two rooks, and have your child place two rooks. Repeat for knights. Then bishops. Now the queen, who "always gets her own color", so the white queen is on a white square, and the black queen on a black square. Then the kings. Then pawns. Take a good look, then have your child remove the pieces and set them all up again. (Starting position is in diagram, above right.)Mini-game: Something's Fishy
Have your child close their eyes or look away. Set up or rearrange the board incorrectly. See if your child can find the mistake. Include the common mistakes like flipping the king and queen, flipping the bishops and knights, and starting with a dark square in the right corner of the board.
FIRST GAMEParent, take it easy. Do not, repeat, do not teach strategy, we're just practicing moving the pieces correctly. Expect your child to move pieces incorrectly. When it happens, simply remind them how that piece moves. Don't correct anything but incorrect piece movements.
Try to keep material even. Don't feel like you need to finish the game, it's fine if you don't (and might be for the best). Enjoy your first chess game with your child! The purpose here is just to move the pieces properly. Don't make the session too long -- stop while it is still fun.
CASTLINGExplain castling. To keep it simple, you might initially skip the rules that say you can't castle while in check, or through check. Do emphasize that you can't castle if the king, or relevant rook, has moved.
Castling video from Uncle Cal --- Castling! video from ChessKid Gold
Mini-game: Can I castle now?
Using the initial position, move your pieces and create positions where castling is allowed, and ask "Can I castle now?" Eventually include positions where castling is not allowed, due to pieces in the way, or from having moved the king or rooks.
STALEMATE AND DRAWExplain how sometimes neither player wins. If you can't checkmate the other player, you can't win. In other games, it's called a tie, but in chess it's called a "draw".
Show a position with only two kings -- a draw. Explain a draw by mutual agreement. Now explain "stalemate" and show lots of simple examples. Now include positions that are almost stalemate, but not quite.
Stalemate video from Uncle Cal --- Stalemate! ChessKid Gold video --- Chess Words: Draw ChessKid Gold
Mini-game: Checkmate, Stalemate, or Make A Move
Download and print the PDF handout from ProfessorChess.com. Set up the positions on the board. For each position, you can both decide if it's checkmate, stalemate or neither. Then look up the answer.
GETTING OUT OF CHECK
Explain that besides just moving out of check, there might be two other ways to get out of check: By blocking an attack, or capturing the checking piece. Activity: Construct various positions where your child must get out of check by blocking, or capturing the attacking piece. Have your child find a way out of check.
Getting Out of Check video from Uncle Cal --- Check! video from ChessKid Gold
CHECKMATE WITH A QUEENLearn how to checkmate with the Queen. Along with Uncle Cal's instruction, here's a Rockford handout for reference, and a ChessKid Gold video showing how.
Now practice, either with each other, or at ChessKid Workouts.
CHECKMATE WITH TWO ROOKSLearn how to checkmate with two rooks, or a rook and queen. Along with Uncle Cal's instruction, here's a Rockford handout for reference, and a ChessKid Gold video showing how.
Now practice the "rolling rooks", either with each other or at ChessKid Workouts.
AVOID SCHOLARS MATESome children learn and get hooked on the four move checkmate, "Scholar's Mate". Once your child starts playing other kids, and especially before their first tournament, make sure they can defend against Scholar's Mate. Instruct your child not to attempt Scholar's Mate themselves, as it teaches bad habits (bringing the Queen out too early) and will keep them from playing a real game of chess.
Along with Uncle Cal's instruction, here's a Rockford handout (page 1, page 2) for reference, and a YouTube video from Mrs. Ruppel explaining Scholar's Mate.
Now practice stopping Scholar's Mate. With your child playing black, start a game with 1.e4 e5 2.Qh5 and play from there.
EN PASSANTThis rule is confusing, and does not need to be taught until your child is older, or will be playing in a tournament. Along with Uncle Cal's instruction, here's a Rockford handout for reference, and a ChessKid Gold video explaining En Passant.
Have your child create a situation on the board where an en passant capture could occur, and then demonstrate the move to you.
TOUCH MOVE RULE"Touch Move" means if you touch a piece, you must move it. This rule is used in all tournaments, and should be learned and practiced at home if your child is about to play in a tournament.
ADDITIONAL RESOURCES
If you'd like all the basic rules on one page (both sides) as a reference, print this out (half inch margins).
For more on teaching chess to young children, read Chess is Child's Play: Teaching Techniques That Work by Laura Sherman and Bill Kilpatrick, which contains many of the ideas above. Includes special exercises for 2 to 4 year olds, and solutions to common problems or issues that may arise when teaching or playing.
For a fun activity, kids can make their own two-dimensional chess set with paper printouts and scissors. Try the printable chess boards and pieces at RoyalBaloo or ActivityVillage.
The Language of Chess: Resign - ChessKid video. A term and concept worth knowing, not covered above.
There are several online chess schools with structured curriculum. For pre-readers, ZoomChess is good. For readers, Chess Magnet School, Chessity, Learning Chess, Chess Mentor and Chesscademy are well done.
The DVD series Elliott's Chess School is exceptional, and should work with pre-readers. Speaking to younger players, Elliott gives chess lessons in an orderly, sequential fashion. Optional matching workbooks are available. Check your local library for the first volumes.
The PC game Learn to Play Chess with Fritz and Chesster 2 is good, as is Lego Chess. Again, check your library.
The Whatcom County Scholastic Chess FAQ answers many parents' questions.
|
Send comments/questions/suggestions for this site to Randy Kaech Northwest Washington Scholastic Chess Copyright (c) 2015 |